Queen's Tears Plant (Billbergia Bromeliads) Care Indoors, Propagation, Problems
Some links in this post may be affiliate links
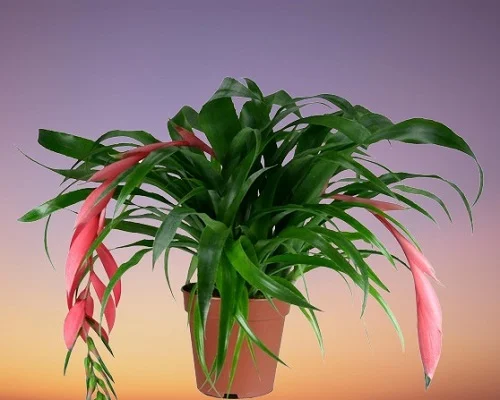
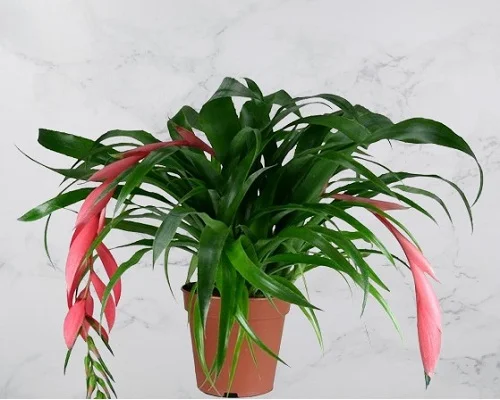
Billbergia Bromeliad also called Queen's Tears Plant or Friendship Plant is one of the easiest Bromeliad varieties and is grown for the beauty of its drooping showy flower-heads and leathery, arching long grass-like leaves.
The drooping flower-head with about 3 inches long bracts and the 1 ft long, arching leaves which turn reddish under good light look spectacular in a hanging basket, on a table top, a pedestal or atop a shelf.
The common name, 'Queen's Tears', is due to the drops of nectar that the plant produces when it is touched or is moved. While the common name, 'Friendship Plant', is because it is easy to share with friends from the pups (offsets) that form at the base of the plant.
The usual pattern in Billbergia Bromeliads like in Flaming Sword Bromeliads (Vriesea Bromeliads) is a rosette of leathery, strap-like foliage and flower-head which arises on a stalk from the cup-like center of rosette.
Botanical name: Billbergia
Family: Bromeliaceae
Sufamily: Bromelioideae
Common names: Queen's Tears Plant, Friendship Plant
Origin
Billbergia Bromeliads are native to Brazil, Paraguay, Uruguay and Argentina.
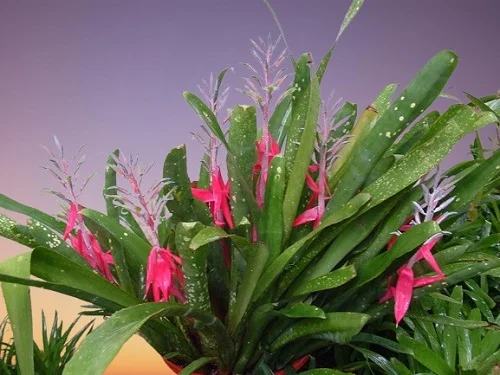
Flower
Queen's Tears Plant matures at the age of 2-3 years and flowers quite easily in spring and the display may last several months. Once the flower-head fades, the rosette of leaves begins to die and is replaced by offsets (pups) at the base. The display of the flower-head is due to the presence of long-lasting showy bracts; true flowers are small and short-lived.
Varieties
The most popular of the Billbergia Bromeliads for growing indoors is the Billbergia nutans. Another of the Billbergia Bromeliads that is common is Billbergia windii which is larger, with the flower-stalks being about 18 in. long and the foliage is grey-green.
Is Queen’s Tears Plant Toxic?
No. Queen's Tears Plants are non-toxic to humans and pets. They are among plants safe for cats and dogs. However, the leaves bear short spines which may cause physical injury if handled with bare hands. Always wear gloves when handling these bromeliads to prevent injury.
Why Grow Queen’s Tears Indoors?
Here is why you should consider adding Queen’s Tears to your indoor plant collection:
- Low maintenance: It requires minimal care compared to other tropical plants.
- Hardy and resilient:It tolerates neglect and adapts well to indoor conditions.
- Beautiful blooms: It bears exotic, pendulous flowers in pink, blue, and yellow hues
Where to Buy
If you would like to add Queen's Tears Plants to your collection, you may get them online from Etsy (Link to Etsy).
Queen's Tears Plant Indoor Care
To properly care for Queen's Tears Plant indoors, provide bright indirect light, warmth of 18-280C, humidity of 60-70% and moderately moist, rich, well-drained orchids soil coupled with fortnightly feeding during the growing season.
Billbergia Bromeliads are sensitive to chlorine and other chemicals dissolved in water, therefore water with chlorine-free water only that is at room temperature to avoid plant shock. Keep reading for more on the growing conditions and how to achieve them.
Watering
Like with other rosette Bromeliads, Queen's Tears Bromeliads require that the central 'vase' be filled with water at all times. Empty and refill the 'vase' regularly to prevent growth of bacteria which may cause the water to become smelly.
Use only chlorine-free water as these plants are sensitive to chlorine and other chemicals that may be dissolved in water. Ensure the water is at room temperature to prevent cold shock which can cause stunted growth.
Water the soil only when it dries to keep the roots moist. Avoid soggy soil as it can lead to root-rot and eventual death of the Bromeliad.
Light Requirements
Queen's Tears Plant grows best in bright indirect light (filtered light). Bright light is necessary to promote flowering. Direct sunlight will cause the leaves to lose their dark-green color to appear washed out with pale-brown leaf patches.
If the light is too little, growth will slow down and the plant will produce fewer blooms. Therefore, move the plant to a brighter spot or instal a grow light if the natural lighting is not sufficient.
Give the pot a quarter turn every month, to ensure that the bromeliad receives light on all sides, for uniform growth to prevent unbalanced growth.
Outdoors, Queen's Tears Bromeliad can be grown in a shaded place like under a tree where it is shielded from direct sunlight.
Temperature & Humidity
Queen's Tears flourishes in a warmth of 18-280C. Keep it away from drafts to avoid sudden changes in temperature which can lead to reduced growth, wilting, drooping and yellowing.
To bring Billbergia Bromeliad to flower requires temperatures above 260C. You can achieve this temperature by taking this plant outside during the hot season but put it under a light shade.
Queen's Tears Bromeliad prefers a humidity of 60-70%. If the humidity is too low, the plant will respond with brown leaf tips and edges. To upscale humidity, set the pot on a wet pebble tray or grow the plant is a well-lit bathroom or kitchen. Ensure good air circulation to prevent fungal diseases.
Fertilizer
Feed Queen's Tears Plant with a liquid fertilizer (foliar feed) every 2 weeks during the growing season to encourage a lush growth. Do not feed in the cold season as growth is minimal at this time and it may lead to fertilizer burn.
Potting Soil
The best soil for Queen's Tears is an orchids potting mix that is rich in organic matter, loose, free-draining to prevent waterlogging while providing the required nutrients.
Repotting
Repotting Queen's Tears Bromeliad is not necessary as its roots are tiny and are unlikely to fill the pot. Pot it in a wide, shallow, heavy pot to prevent it from toppling over as it can become top-heavy. In addition provide support for the plant to help keep it upright and prevent it from toppling over. Check out these ceramic pots with drainage holes on Amazon.
Pruning
Pruning Queen's Tears Plant involves removal of dead leaves to keep the plant neat and minimize pest and disease infestations. This also allows adequate room for the new plants (pups) to grow.
Remove the dead foliage by cutting at the base with a sharp, clean knife or with a sharp, clean pair of pruning scissors to minimize injury and disease infestations.
Queen's Tears Plant Propagation
Billbergia Bromeliads propagation is best done at the beginning of the growing season, from the offsets (pups) appearing at the base of the plant.
Propagating Queen's Tears Plant from offsets (pups)
- When the offset is several months old or 1/3 to 1/2 the height of mother plant, separate it from the mother by cutting with a sharp, clean knife or scissors.
- Ensure the offset (pup) has some roots attached to it as they are necessary to provide support for the pup.
- Plant the offset shallowly in loose, free-draining, bark soil. Use a shallow heavy pot to prevent the plant from toppling over as it can get top-heavy.
- Make sure the bromeliad is well supported to prevent it from toppling over as the root system is small.
- Place the set up in a warm, well-lit spot until the new bromeliad is well established after which routine care can begin.
Learn more on how to propagate Bromeliads from pups.
Queen's Tears Plant Problems & Solutions
Billbergia Bromeliads problems are lack of blooms, plant dying, drooping leaves, brown leaf tips, pests and diseases among others. Keep reading for more on these problems and how to fix them.
Lack of blooms
Lack of blooms on Queen's Tears Plant is caused by insufficient light, nutrients deficiency, inconsistent water, temperature stress or dry air.
How to fix it
Insufficient light: Move the plant to a brighter spot ahere it will receive bright indirect light or use a grow light if the natural light is not enough.
Nutrients deficiency: Fertilize the plant with a phosphorous-rich fertilizer every 2 weeks in the growing season.
Dry air: To increase humidity, use a cool mist humidifier or set the pot on a wet pebble tray.
Inconsistent watering: Keep the soil moderately moist, do not allow the soil to dry out completely.
Temperature stress: Keep the plant away from sources of drafts like hot air vents, radiators, AC units, open doors, drafty windows among others.
Plant dying
Queen's Tears Plant may be dying due to two causes; maturity or root-rot disease.
1. If the Billbergia Bromeliad has flowered, then rotting and death of the rosette which bore the flower-stalk is natural to give room to the new plants (pups). Remove the dead foliage by cutting at the base with a clean knife or a pair of scissors.
2. If the Queen's Tears Plant has not flowered, the cause of death is root-rot disease which is enhanced by soggy soil. The disease is characterized by yellowing and wilting of the leaves which is rapidly followed by browning and plant collapse.
How to fix it
- Slip the plant out of its pot and inspect the roots.
- Trim brown-black, mushy roots and treat the healthy roots with a copper-based fungicidal solution as indicated by the manufacturer.
- Disinfect the pot with the fungicidal solution or use a fresh pot to repot the plant.
- Ensure the pot has a drainage hole and the soil is free-draining prevent sogginess.
- Do not water the plant immediately; keep it dry for 5-7 days before you resume watering.
- Lessen watering in fall and winter to keep the soil slightly moist as growth is slowed at this time.
Drooping leaves
Drooping leaves on Queen's Tears Bromeliad are caused by too little light, inconsistent watering or temperature stress.
How to fix it
Too little light: Position the bromeliad in bright indirect light or use grow lights if the natural lighting is not adequate.
Inconsistent watering: Keep the soil moderately moist and do not allow the soil to dry out completely.
Temperature stress: Keep the plant away from sources of drafts like hot radiators, AC units, air vents, open doors, drafty windows among others.
Brown leaf tips
Brown leaf tips on Queen's Tears are caused by too low humidity. To raise humidity, set the pot on a wet pebble tray or use a cool mist humidifier. You can also grow the bromeliad in a well-lit bathroom or other moist areas in the home.
Pests
Common pests pf Queen's Tears Plant are scale insects and mealybugs which are prevalent in dry conditions.
How to fix it
- Seperate the infested plant to minimize spread to other plants and treat it with neem oil or insecticidal soap as per the manufacturers' instructions.
- Keep the plant well pruned to reduce the hiding and breeding places for these pests.
- Set the plant on a wet pebble tray to elevate humidity as it discourages the pests.
Frequently Asked Questions (FAQs)
1. How much sunlight does Queen’s Tears need?
Queen’s Tears thrives in bright, indirect light but can tolerate lower light conditions.
2. How often should I water my Queen’s Tears Plant?
Water your Queen’s Tears Plant? when the top 1-2 inches of soil is dry. Avoid letting water sit in the soil for too long.
3. Why isn’t my Queen’s Tears Plant blooming?
Your Queen’s Tears Plant may need more light or fertilizer. Ensure it’s in a bright location and fertilize monthly during the growing season.
4. Can Queen’s Tears survive in low humidity?
Yes, but Queen’s Tears flourishes in higher humidity. Use a pebble tray or a humidifier if your home is dry.
5. How long does Queen’s Tears live?
Queen’s Tears is a monocarpic plant; the mother plant blooms once, then produces pups before eventually dying back. The new pups continue the plant’s life cycle.
You liked it? Share on social media.
Related Content
Amazon Associates Disclosure
Homeplantsguide.com is a participant in the Amazon Services LLC Associates Program, an affiliate advertising program designed to provide a means for sites to earn advertising fees by advertising and linking to amazon.com.