Satin Pellionia (Pellionia pulchra) Care Indoors; Watering, Pruning, Propagation, Problems
Some links in this post may be affiliate links
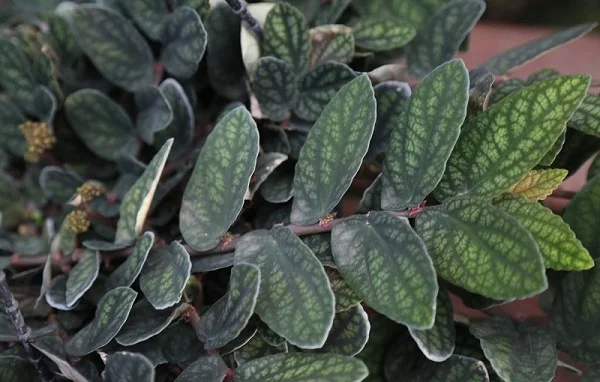
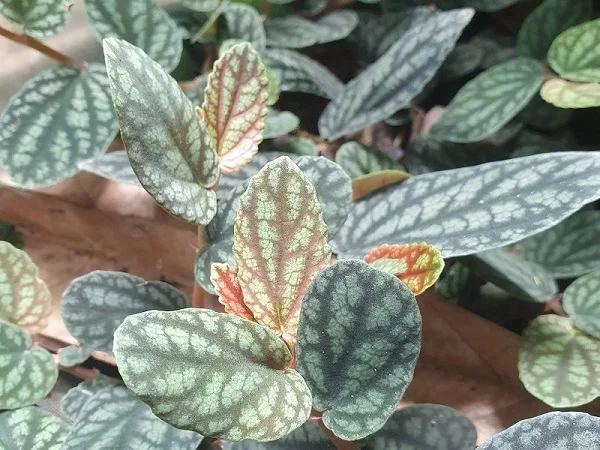
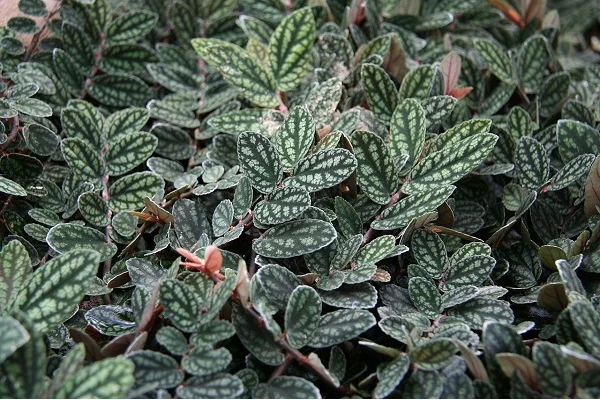
Pellionia pulchra commonly called Satin Pellionia or Watermelon Pellionia is a relatively low-maintenance plant which bears small variegated leaves in green and silver, with trailing darker stems making it ideal for a hanging basket.
Watermelon Pellionia has a high humidity requirement and does not like cold drafts placing it among popular plants for a closed terrarium or a bottle garden where warm, humid conditions are achievable.
Botanical name: Pellionia pulchra
Family: Urticaceae
Common names: Satin Pellionia, Watermelon Pellionia
Origin
Pellionia pulchra is native to South East Asia in Burma, Malaysia and Vietnam.
Related Plants
Another variety of Pellionia that is grown indoors is Pellionia repens ( Polynesian Ivy Vine) which bears a pale central band on each leaf with an olive or bronzy green outer margin.
Is Satin Pellionia pet-friendly?
Satin Pellionia is non-toxic to humans and pets as outlined by ASPCA. It is safe to grow in the home or office space.
Where to Buy
If you are looking to add Pellionia Plants to your collection, you may acquire these plants online from Etsy (Link to Etsy).
How to Care for Pellionia pulchra Indoors
To care for Pellionia pulchra indoors, give it medium to bright indirect light, warmth of 18-260C, humidity of 60-70% and consistently moist, rich, well-drained soil coupled with monthly feeding in the growing season.
Satin Pellionia requires regular pruning to keep the plant neat and tidy, to encourage a bushy growth as well as get rid of the insignifacant flowers to redirect energy to growth. Repotting is only needed when the plant becomes extremely pot-bound. Keep reading for more on the best growing conditions and how to achieve them.
Watering
Water Pellionia pulchra liberally during the growing season and keep the soil moist through out. Avoid overwatering to prevent rotting, drooping, yellowing and leaf loss.
Decrease watering in the cold season to keep the soil slightly moist. Never leave the soil to dry out completely for a long period to avoid wilting, drooping, yellowing, leaf loss and crispy leaf edges. Satin Pellionia loves even moisture, so check the soil every few days to keep it from drying out completely.
Ensure that the soil is free-draining and the pot has a drainage hole to prevent waterlogging which can lead to root-rot and loss of the plant. Always discard excess water from the saucer to avoid soil sogginess.
Use room temperature as consistently watering with very cold water can lead to stunted growth and leaf drop. Only use chlorine-free water to prevent browning of leaf edges.
Light Requirements
Satin Pellionia grows best in medium to bright indirect light (filtered light); place it near a bright, sunless window. Keep it away from direct sunlight to prevent scorching of the leaves (unsightly, brown marks on the leaves).
If your plant’s leaves fade or it becomes leggy, move it to a brighter spot or use a grow light if the natural lighting is insufficient.
Once a month, give the pot a quarter turn, to ensure that the plant receives light on all sides for a balanced growth as well as prevent legginess.
Temperature & Humidity
Pellionia pulchra thrives in a warmth of 18-260C. Keep it away from sources of drafts to prevent temperature flactuations which can cause stunted growth, drooping, yellowing and leaf drop.
Satin Pellionia prefers a humidity of 60-70%. Too little humidity will result in leaf curl and brown edges. To improve humidity, set the pot on a wet pebble tray or use a cool mist humidifier. You may also grow the plant in a terrarium as a high humidity and warmth can be maintainted inside a terrarium.
Potting Soil
The best soil for Satin Pellionia should be a light, airy, and moisture-retaining soil mix. A potting mix made up of 1 part peat moss or coconut coir (retains moisture), 1 part perlite or orchid bark (improves drainage) and 1 part organic potting mix (for nutrients) is ideal for this plant..
Fertilizer
Feed Pellionia pulchra with a balanced, water-soluble fertilizer every 4 weeks in the growing period. Stop feeding in the cold season as growth is minimal and feeding at this time may cause fertilizer burn; burnt leaf tips.
Repotting
Repot Satin Pellionia during the growing season only when the plant has become extremely pot-bound as it grows best when the roots are confined.
Use a pot one size larger than the current one and ensure that the pot has a drainage hole to avoid getting soggy soil which can lead to root-rot. Check out these self watering planters on Amazon.
Satin Pellionia Pruning
Pruning Pellionia pulchra involves pinching any flower buds as they appear. The flowers require a lot of nourishment from the plant which may affect its proper growth.
Remove any dead foliage frequently to keep the plant tidy and discourage pests and diseases. Pinch off the growing tips to encourage a bushy, compact growth and prevent the plant from becoming leggy too soon.
Pellionia pulchra Propagation
Satin Pellionia propagation can be done at the beginning of the growing season from stem cuttings or by plant division.
(A) Pellionia pulchra propagation from stem cuttings
Stem cuttings root easily and there is no need for a rooting hormone. The cuttings made rooted in soil or in water.
1. Propagating Pellionia pulchra from stem cuttings in soil
- Take stem cuttings of about 4-5 inches length from a healthy plant. Ensure each cutting has at least one set of leaves and 2-3 leaf nodes.
- Select a rooting container. Ensure it has a drainage hole to prevent the soil from getting soggy to avoid rotting.
- Fill the rooting container with well-drained rooting soil.
- Moisten the soil and make a hole that is slightly wider than the stem of the cutting.
- Insert 2-3 inches of the lower cut end of the cuttings in the previously made hole and lightly firm the soil around it.
- Cover the set up with a plastic bag or use a humidity dome to encourage rooting.
- Place the set up in warm, well-lit place away from direct sunlight to avoid scorching.
- Maintain the soil moist until new growth emerges which indicates rooting and may take 2-4 weeks.
- Once there is substantial growth, transfer the new plants to individual pots in well-drained soil and begin routine care.
2. Propagating Pellionia pulchra from stem cuttings in water
- Take stem cuttings of about 4-5 inches length from a healthy plant. Make sure each cutting has at least one set of leaves and 2-3 leaf nodes.
- Submerge 2-3 inches of the stem in a jar of plain water or in a propagation station.
- Cover the set up with a plastic bag or a humidity dome to enhance rooting.
- Position the set up in a brightly-lit spot away from direct sunlight.
- Change the water every 5-7 days to prevent fungal growth.
- When the roots are about 2-3 inches, transfer the cuttings into small pots in moist, well-drained soil.
- Place the pots in a warm place under bright indirect light to avoid scorching.
- Keep the soil moist until new plants are well established.
- When the plants are well established, transplant into a pot 1 size larger in well-drained soil, after which you can begin routine care.
(B) Pellionia pulchra propagation by plant division
This method of Pellionia pulchra propagation is best for large plants which may have outgrown their pots. Division of plants is a faster and succesful way of multiplying your plants.
3. Propagating Pellionia pulchra by plant division
- Water the plant thoroughly at least one day before to make it easier to divide and also hasten establishment. A well hydrated plant suffers less shock and takes a shorter time to take root.
- Slip the plant out of its pot and carefully divide it into several sections. Confirm that each sections has adequate roots.
- Select a 6 or 8 inches pot and ensure it has a drainage hole to prevent the soil from getting soggy to avoid rotting.
- Fill the pot with free-draining, potting soil and moisten it lightly.
- Make a hole in the center of the pot. Ascertain that the hole is slightly wider than the root base of the section.
- Place the section in the previously made hole and lightly firm the soil around the base. Take care to maintain it at the same soil level it was in the previous pot.
- Wet the soil thoroughly and place the set up in a well-lit, warm place away from direct sunlight.
- Allow the new plant to be well established after which you can begin routine care.
Pellionia pulchra Problems & Remedies
Satin Pellionia problems are leaf drop, wilting leaves, brown leaf tips, pests and diseases among others. Keep reading for more on these problems and their solutions.
Leaf drop
Leaf drop off Satin Pellionia is caused by too little light, temperature stress, inconsistent watering, soggy soil, dry air or aging.
How to fix it
Too little light: Position the plant in medium to bright indirect light or use a grow light if the natural lighting is not enough.
Temperature stress: Keep the plant away from sources of drafts like drafty windows, AC units, windy doors, hot air vents, radiators and others, to maintain a warmth of 18-260C.
Inconsistent watering: Do not water on a schedule; water only when the top 1-2 inches of the soil feel dry.
Soggy soil: Use a well-draining soil and a pot with a drainage hole.
Dry air: To raise humidity, set the pot on a wet pebble tray, use a cool mist humidifier or group the plants together.
Aging: It is natural for the old leaves to turn yellow and drop as the plant matures.
Wilting leaves
Wilting leaves on Satin Pellionia are due to inconsistent watering or temperature stress.
How to fix it
Inconsistent watering: Water when the top 1-2 inches of soil dry out and never allow the soil to dry out completely.
Temperature stress: Keep the plant away from sources of drafts like AC units, windy doors, drafty windows, hot air vents, radiators and others, to maintain a warmth of 18-260C.
Brown leaf tips and edges
Brown leaf tips and edges on Satin Pellionia are caused by dry air. To increase humidity, set the pot on a wet pebble tray or grow the plant in a well-lit bathroom, kitchen and other moist areas in the the home.
Pests
Common pests of Satin Pellionia are aphids, scale insects, whiteflies and mealybugs which are prevalent in dry conditions.
How to fix it
- Isolate the infested plant to minimize spread to other plants.
- Treat the affected plant with neem oil or insecticidal soap as per the manufacturers' instructions.
- Keep the plant well pruned to reduce the pests.
- Set the pot on a wet pebble tray or group the plants together to raise humidity to depress the pests infestations.
Diseases
Satin Pellionia is prone to powdery mildew which is prevalent in a warm humid environment. It presents as brown-grey dust on the leaves.
How to fix it
Isolate the affected plant to prevent spread to other plants and treat it with an insecticidal soap or neem oil as indicated by the manufacturers.
Ensure there is free air flow to minimize disease infestations.
Summary: Satin Pellionia Care
- Lignt: Bright indirect light
- Water: Keep the soil consistently moist and never soggy
- Humidity: High humidity (above 50%)
- Temperature: Average warmth (18-260C)
- Feeding: Monthly with a balanced, water-soluble fertilizer
- Soil: Well-draining, rich organic mix
- Pruning: Remove dead leaves and flowers, pinch off growing tips, cutback leggy stems
- Repotting: When extremely pot-bound
- Propagation: Stem cuttings, division
Frequently Asked Questions (FAQs)
1. Can Satin Pellionia grow in low light?
Satin Pellionia can survive in medium light, but it thrives in bright indirect light.
2. Is Pellionia pulchra a fast grower?
Yes. Pellionia Pulchra grows quickly, especially in warm, humid conditions.
3. Can I grow Satin Pellionia in a terrarium?
Satin Pellionia is perfect for terrariums due to its high humidity needs.
4. How do you propagate Pellionia pulchra?
Pellionia pulchra is propagated from stem cuttings and by plant division during the growing season (spring and summer).
You liked it? Share on social media.
Related Content
Amazon Associates Disclosure
Homeplantsguide.com is a participant in the Amazon Services LLC Associates Program, an affiliate advertising program designed to provide a means for sites to earn advertising fees by advertising and linking to amazon.com.