Nerve Plant Propagation: How to Propagate Fittonia Varieties in 3 Easy Ways
Some links in this post may be affiliate links
Nerve Plants (Fittonia) are best propagated at the beginning of the growing season by plant division or from stem-tip cuttings which can be rooted either in water or in soil.
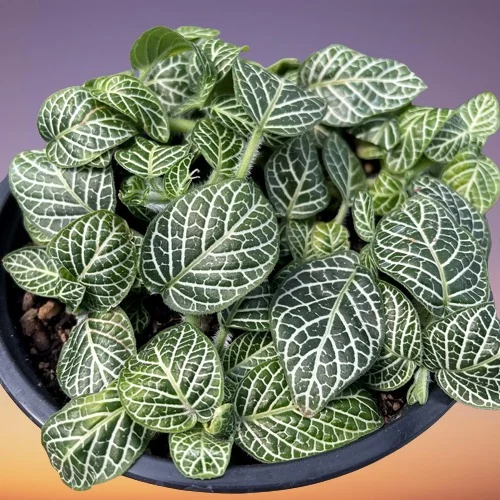
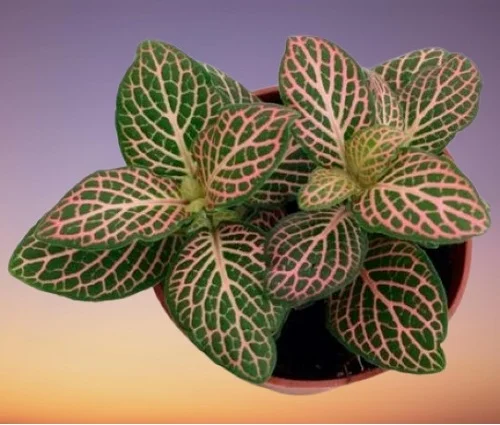
Fittonia Varieties are easily recognisable from their leaves which bear a network of white, pink or red veins and are perfect for the small spaces like desktop, tabletop, closed terrarium, bottle garden among others.
Nerve Plants are easy to grow indoors and thrive in medium to bright indirect light, warmth of 15-270C, humidity of 60-70% and consistently moist, fertile, well-drained soil coupled with monthly feeding in spring and summer. Learn how to grow and care for Nerve Plants indoors.
Fittonia Varieties are easily propagated from stem-tip cuttings or by plant division by 3 easy methods. Keep reading for a detailed outline on these propagation methods.
1. Nerve Plant propagation from Stem-tip Cuttings in water
- Take 4-5 inches long stem-tip cuttings from a healthy plant and ensure each has several leaf nodes as this is where new growth will come from.
- Strip off the lower leaves and dip the lower cut end of the cutting in a rooting hormone to promote rooting.
- Submerge at least 2-3 inches of the cutting in a jar of plain water or in a propagation station as this is where roots will grow from.
- Place the set up in a warm, well-lit spot away from direct sunlight. Change the water every 5-7 days to avoid fungal growth.
- When a good amount of roots have formed on the cuttings, transfer the cuttings into individual pots in moist potting soil. Make sure each pot has a drainage hole to prevent rotting.
- Position the pots in a warm, well-lit place away from direct sunlight to prevent scorching.
- Maintain the soil moist until new growth has emerged and substantial growth has been observed.
- Transfer the new plant into a pot 1 size larger in well-drained soil afterwhich you can begin routine care. For a fuller plant, transfer several cuttings into one pot.
2. Nerve Plant propagation from Stem-tip Cuttings in soil
- Take stem-tip cuttings of about 4-5 inches long from a healthy plant while ensuring that each cutting has some leaf nodes as this is where new growth will come from.
- Strip off the lower lower leaves and retain at least 2 sets of leaves on top.
- Allow the sap to dry and then dip the lower cut end cutting in a rooting hormone to hasten rooting.
- Select a rooting container and ensure that it has adequate drainage to prevent the soil from getting soggy as it can lead to rotting.
- Fill the container with free-draining, potting mix and make a hole in the center. Ensure that the hole is slightly wider than the base of the stem cutting.
- Insert about 2-3 inches of the lower cut end of the cutting in the previously made hole and lightly firm the soil around the cutting while taking care not to bury it too deep.
- Water the soil thoroughly. To hasten rooting of the cutting, create a mini-greenhouse by covering the set up with a clear polythene sheet or bag.
- Ensure the leaves of the cutting do not touch the sheet or bag too much by propping it up with sticks.
- Place the set up in warm, well-lit spot away from direct sunlight to avoid scorching.
- Maintain the soil moist through out until new growth emerges; new growth indicates the cutting has rooted.
- Gradually over a period of two weeks, remove the plastic bag cover to acclimate the new plant to ordinary growing conditions.
- Once well established, you may begin normal routine care. For a fuller plant, transfer several cuttings into one pot.
3. Nerve Plant propagation by Plant Division
- Water the plant thoroughly at least 1 day before to make it easier to divide and also hasten establishment.
- Slip the plant out of its pot and carefully divide it into sections by pulling apart the roots. Ensure each section has adequate roots to hasten establishment.
- Select a 6 or 8 inches pot and ensure that the pot has a drainage hole to prevent the soil from getting soggy as it can lead to rotting.
- Fill the pot with the succulents potting mix and moisten the soil slightly. Make a hole in the center of the pot and make sure that the hole is slightly wider than the root base of the section.
- Place the section in the previously made hole and lightly firm the soil around the base while taking care not to bury it too deep; maintain the section at the same soil level it was in the previous pot.
- Water the soil thoroughly until the water comes out through the drainage hole.
- Place the set up in a warm, brightly-lit place away from direct sunlight.
- Maintain the soil moist until the new plant is well established afterwhich you can begin routine care.
You liked it? Share on social media.
Related Content
Amazon Associates Disclosure
Homeplantsguide.com is a participant in the Amazon Services LLC Associates Program, an affiliate advertising program designed to provide a means for sites to earn advertising fees by advertising and linking to amazon.com.