Brassavola Orchid Care Indoors; Watering, Light, Humidity, Propagation, Problems
Some links in this post may be affiliate links
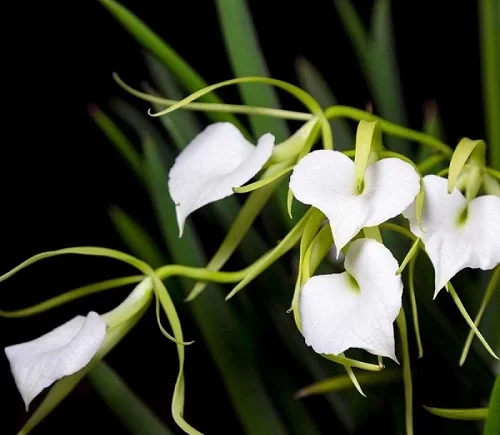
Brassavola Orchids are popular orchids which bear very fragrant flowers with a citrusy smell but they are only fragrant at night and last a few days only.
The leaves are long, thin, tubular about 1 feet long and may sometimes appear unrolled or flattened. The leaves are mottled with slight reddish marks. They have much smaller pseudobulbs, so the leaves appear to emerge from the rhizomes.
The Brassavola genus comprises of about 21 species of orchids. Brassavola Orchid was named in 1813 by the Scottish botanist Robert Brown after the Italian nobleman and physician Antonio Musa Brassavola (one of the most famous physician of his time). The genus is abbreviated B in trade journals.
Botanical name: Brassavola
Family: Orchidaceae
Subfamily: Epidendroideae
Tribe: Epidendreae
Subtribe: Laeliinae
Origin
Brassavola is a genus of orchids widespread across Mexico, Central America, West Indies and South America. Brassavola Orchids are epiphytes; they grow on the bark of trees and derive moisture and nutrients from the air, rain or debris accumulating around them.
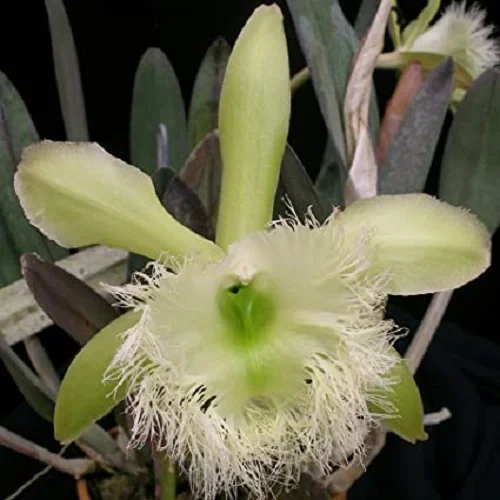
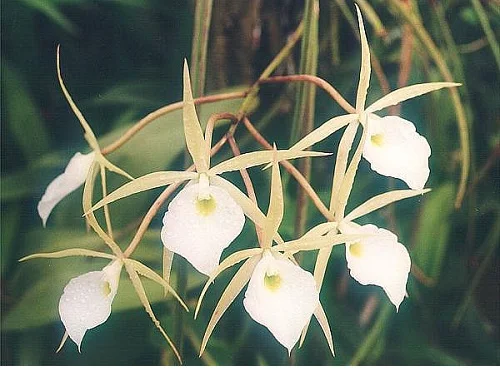
Flower
Brassavola Orchid flowers are small and comprise of three sepals and two lateral petals which are greenish, narrow and long. These orchids bloom the year-round; they bloom several times in a year. It is among the best flowering plants for the home, office and other suitable places.
Related Genera
Brassavola Orchids are related to the genera Cattleya and Laelia with which they have been used extensively in hybridization to create a multitude of colors.
Is Brassavola Orchid toxic?
No. Brassavola Orchids are non-toxic to both humans and pets. They are safe to grow indoors.
Where to Buy
If you are looking to add Brassavola Orchids to your collection, you may get them online from Etsy (Link to Etsy).
How to Care for Brassavola Orchid Indoors
To care for Brassavola Orchid indoors, provide bright light with 4-6 hours of direct sunshine, warmth of 18-290C, humidity of 60-70% and moderately moist, fertile, loose, well-drained, orchids potting soil coupled with monthly feeding during the growing season.
Brassavola Orchids needs regular pruning to keep them neat and discourage pest and disease infestation. Repotting is need when growth begins to suffer or the medium becomes completely broken down. Keep reading for more on these growing conditions and how to achieve them.
Watering
Water Brassavola Orchid thoroughly in spring and summer and allow the top half of the soil to dry out between waterings. Keep the soil moderately mois and avoid overwatering to prevent rotting, drooping and yellowing.
Cut down on watering in fall and winter as growth is minimal at this time. Do not let the soil dry out completely as underwatering can result in wilting, yellowing and drooping or wrinkly leaves.
Use tepid water as consistently watering with cold water will result in cold shock which can cause stunted growth. Only water with chlorine-free water to prevent staining and browning of leaf edges.
Ensure the soil is well-draining and the pot has adequate drainage to prevent waterlogging which can result in rotting and orchid death. Avoid wetting the foliage to minimze fungal diseases and rotting which can cause the orchid to die.
Brassavola Orchids unlike Lady Slippers Orchid (Paphiopedilum Orchids) are more tolerant to dry soil due to their tubular-shaped leaves, which are designed to reduce water loss through transpiration. As such take care not to overwater the orchid as too much water may cause the orchid to rot.
Light Requirements
Brassavola Orchid flourishes in bright light with 4-6 hours of morning or late afternoon sunshine. Keep it away from hot sunshine to prevent scorching of the leaves.
A Brassavola Orchid that is receiving the right amount of light has mottled leaves with slight reddish marks. Dark green leaves indicate that the orchid needs more light. Yellowish leaves mean that the orchid is receiving too much light.
If the natural lighting is not sufficient, you may use full spectrum grow lights to supplement it.
Give the pot a quarter turn every month, to ensure that the orchid receives adequate light on all sides for even growth.
Temperature & Humidity
Brassavola Orchid thrives in a warmth of 18-290C. Warmer days and cooler night temperatures with a difference of 10-150C are ideal for this orchid. The cool nights are essential to trigger flowering.
Ensure that there is good air circulation as Brassavola Orchid cannot tolerate hot and stuffy conditions. Keep it away from drafts to avoid sudden changes in temperature which can cause reduced growth, drooping, leaf curl and leaf drop.
A humidity of 60-70% is ideal for Brassavola Orchids; low humidity will result in brown leaf tips. If the air is too dry, set the pot on a wet pebble tray or use a cool mist humidifier to increase humidity. Do not mist the leaves and maintain a good air flow to reduce fungal diseases.
Fertilizer
Feed Brassavola Orchids every 4 weeks in spring and summer with an orchid's fertilizer as per the manufacturer's instructions. Stop feeding in fall and winter as growth is minimal at this time. Do not feed an orchid that is in flower.
It is better to err on the side of underfeeding than overfeeding as overfeeding may result in loss of roots thus death of the orchid. Overfeeding can also lead to vegetative growth instead of flower production.
Potting Soil
The best potting soil for Brassavola Orchid should be rich in organic matter, loose, free-draining, bark soil to prevent sogginess. An Orchids potting mix is ideal for these plants.
Repotting
Brassavola Orchids bloom best when they are pot-bound. Repot only when growth begins to suffer; when the orchid has outgrown its pot and the new growth reaches out over the edge of the pot or when the soil has broken down completely.
Basically repotting a Brassavola Orchid every 2-3 years should be adequate. Repot it only when new growth begins, shortly after blooming is over.
Select a pot with proper drainage holes or slits as the roots need good air circulation. The pot should be only 1 size larger than the current one. Take a look at these ceramic orchid pots on Amazon.
Use loose, free-draining, bark soil as the roots require good air circulation. While repotting, shake off excess soil and trim off any dried and shrivelled pseudobulbs. The large orchids can be divided to propagate new plants.
Pruning & Grooming
Pruning Brassavola Orchids is easy. Remove dead and diseased leaves to keep the orchid neat as well as reduce pest and disease infestations.
Cut the leaves at the base with clean, sharp scissors or a knife to avoid unnecessary injury and reduce disease transmission. When flowering is over, cut the flower stalk 1 inch above the 3rd node from the bottom.
Occasionally clean the leaves by damp-wiping with a soft cloth to get rid of dust and also discourage pest and disease infestations.
Brassavola Orchid Propagation
Brassavola Orchids is propagated from the rhizome at the beginning of the growing season once flowering is over.
Propagating Brassavola Orchids from the rhizome
- Gently split the rhizome into sections while ensuring there are at least 3 shoots on each section.
- Seperate the roots attached to each division from the mother's root-ball.
- Remove the old potting soil attached to the section roots and place each section in the center of the pot.
- Bury the roots of the section in the soil while ensuring that the bottom of the pseudobulb is level with the top of the soil.
- The best pot for the section should be about 1-2 inches larger than the pseudobulb.
- Make sure that the pot has enough drainage holes and slits to prevent root-rot of the section.
- Place the set up in a warm, well-lit place away from direct sunlight until sections have established their own roots.
- Water the new Orchids lightly to enhance root development and stake each newly repotted plant to prevent it from toppling over.
Brassavola Orchids Problems & Solutions
Brassavola Orchids problems are lack of blooms, yellow leaves, brown leaves, drooping leaves, pests and diseases. Keep reading for more on these problems and how to fix them.
Lack of blooms
Lack of blooms on Brassavola Orchids is caused by too little light, nutrients deficiency, dry air or lack of temperature variation.
How to fix it
Too little light: Position the orchid in a brighter spot where it will receive bright light with 4-6 hours of morning or late afternoon sunshine or use a grow light to supplement insuffucient light.
Nutrients deficiency: Feed the orchid monthly in spring and summer with an orchid's fertilizer.
Dry air: Set the pot on a wet pebble tray or use a cool mist humidifier to raise humidity.
Lack of temperature variation: Expose the orchid to cooler nights to trigger blooming; a difference of 10-150C is needed.
Yellow leaves
Some of the causes of yellow leaves on Brassavola Orchids are inconsistent watering, soggy soil, too much sunlight or nutrients deficiency.
How to fix it
Inconsistent watering: Do not water on a schedule. Water only when the top half of soil dries out.
Soggy soil: Use a loose, bulky, potting soil and a pot with adequate drainage holes or slits.
Too much sunlight: Keep the orchid away from too much sunlight or filter excess sunlight with a light curtain.
Nutrients deficiency: Apply a quality orchid's fertilizer every 4 weeks in spring and summer.
Brown leaves
Some of the causes of brown leaves on Brassavola Orchids are hot sunlight, underwatering, extreme temperatures or fertilizer burn.
How to fix it
Hot sunlight: Keep the orchid away from hot midday sunshine or filter the light with a sheer curtain.
Underwatering: Do not water on a schedule. Water when the top half of soil feels dry to touch.
Extreme temperatures: Keep the orchid away from sources of drafts like windy doors, stoves, heat sources, AC units among others.
Fertilizer burn: Avoid too much fertilizer and do not feed in fall and winter. Leach out excess chemicals from the soil.
Drooping leaves
Drooping leaves on Brassavola Orchid are caused by inconsistent watering, soggy soil or temperature stress.
How to fix it
Inconsistent watering: Do not water on a schedule; water when the top half of soil dries but do not allow the soil to dry out completely.
Soggy soil: Use a well-draining soil and a pot with adequate drainage.
Temperature stress: Keep the orchid away from sources of drafts like windy doors and windows, radiators, hot air vents, heat sources, AC units among others.
Pests
Common pests on Brassavola Orchid are aphids, mealybugs and spider mites. These pests are prevalent in dry air conditions and poorly ventilated spaces.
How to fix it
- Regularly, inspect the orchid weekly for these pests.
- Treat the infested orchid with neem oil as per the manufacturer's instructions.
- Clean the leaves regularly by damp-wiping with a soft cloth to discourage the pests.
- Keep the plant well pruned to reduce the hiding and breeding places for these pests.
Diseases
Brassavola Orchid is prone to powdery mildew which presents as a whitish, powdery coating on the leaves. The disease is enhanced by over damp conditions, low temperatures and poor air circulation.
How to fix it
- Cut and discard the affected leaves to prevent spread of the disease to other plants.
- Treat the affected orchid with neem oil as recommended by the manufacturer.
- Maintain good air flow to discourage the disease.
- Do not mist the orchid and avoid wetting the foliage during watering to minimize disease infestation.
You liked it? Share on social media.
Related Content
Amazon Associates Disclosure
Homeplantsguide.com is a participant in the Amazon Services LLC Associates Program, an affiliate advertising program designed to provide a means for sites to earn advertising fees by advertising and linking to amazon.com.