Vanda Orchids Care Indoors; Watering, Soil, Fertilizer, Repotting, Propagation, Problems
Some links in this post may be affiliate links
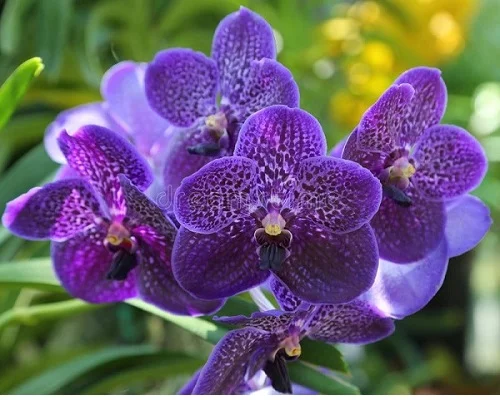
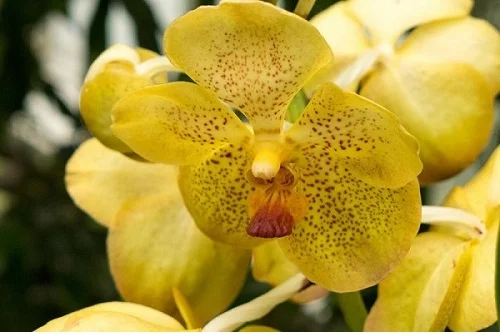
Vanda Orchids are popular Orchids on account of their showy, fragrant, long-lasting and intensely colorful flowers where numerous flowers grow on a lateral flower spike arising from the central stem.
Most Vanda Orchids flowers show a yellow-brown color with brown markings but they also appear in green, white, red, orange, purple, pink and burgundy shades. The lip has a small spur. These orchids bloom every few months and the flowers last for 2-3 weeks.
The growth in Vanda Orchids occurs from a single stem and the leaves are highly variable and adapted to their habitat. The stems vary considerably in size with some growing up to 20 feet tall.
Vanda orchids are monopodial orchids which do not have pseudobulbs but they have leathery, drought-resistant leaves. They have very large root systems which may require that they be grown in hanging baskets inorder to suspend the roots for adequate room.
These Orchids do not tolerate disturbance or damage to roots and it can result in the orchids failing to flower and declining in growth for a season or more.
Vanda orchids like Dendrobium Phalaenopsis Orchids are tolerant to drought conditions due to the presence of leathery, drought-resistant leaves therefore they do not require very frequent watering.

Botanical name: Vanda
Subfamily: Epidendroideae
Tribe: Vandeae
Subtribe: Aeridinae
Origin
Vanda is a genus that is widespread across East Asia, Southeast Asia and New Guinea. Most are epiphytes but some few are terrestrials. The genus name is abbreviated as V. in horticultural journals.
Is Vanda Orchid poisonous?
No. Vanda Orchids are non-toxic to both humans and pets. They are safe for cats, dogs and other pets.
Where to Buy
If you are looking to add this beauty to your collection, you may acquire Vanda Orchids from Etsy (Link to Etsy).
How to care for Vanda Orchids indoors
To care for Vanda Orchid indoors, give it very bright light with 4-6 hours of sunshine, warmth of 21-290C, humidity of 60-70% and consistently moist, rich, well-drained orchids soil coupled with regular feeding in the growing season.
Vanda Orchid requires regular pruning to keep them neat as well as encourage flowering. Repotting is needed only when they become pot-bound or the soil becomes completely broken down. Keep on reading for more on these growing conditions and how to achieve them.
How to water a hanging Vanda Orchid?
If you are growing the Vanda Orchid in a hanging basket, wait until the roots are white or silver then soak them until they turn color to green. Shake off or dry any water on the leaves before replacing your orchid to its usual spot.
How to water a potted Vanda Orchid?
If you are growing the orchid in a bark potting medium, water when roots turn silvery-white; usually when the soil feels dry to the touch. Maintain the soil consistently moist but not soggy to avoid yellowing and rotting.
Reduce watering in the cold season as growth is minimal at this time but do not allow the soil to dry out completely. Drooping or wrinkly leaves indicate that you are underwatering.
Water with tepid (lukewarm water) to avoid shocking the plant as it can result in reduced growth. Use chlorine-free water like rain water, filtered water or distilled water to prevent black, dry leaf tips. Avoid wetting the foliage to minimize fungal diseases.
Do Vanda Orchids need sun?
Yes. Vanda Orchid thrives in very bright light with 4-6 hours of direct sunlight. Keep it away from hot midday sunshine to prevent scorching; brown leaf marks.
A Vanda Orchid that is receiving the right amount of light has light-green leaves. Dark-green leaves indicate that the orchid needs more light. Yellow leaves mean that the orchid is receiving too much light.
If the light is too little, the growth slows and flowering is reduced; position the orchid in a brighter spot or use grow lights if natural light is not adequate.
Regularly turn the pot to ensure that the orchid gets adequate light on all sides for uniform growth as well prevent lopsided growth.
Temperature & Humidity
Vanda Orchid prefers a warmth of 21-290C. Warmer days and cooler nights with a difference of 10-150C are ideal for this orchid; cool nights are essential to trigger flowering.
Keep it away from sources of drafts like radiators, AC units, heat sources, stoves, windy doors and windows among others, to prevent flactuations in temperature as they can cause reduced growth, wilting, drooping and browning leaves.
Vanda Orchid flourishes in a humidity of 60-70%. Low humidity can lead to brown leaf tips and edges. To increase humidity, set the pot on a wet pebble tray or use a cool mist humidifier. Do not mist the leaves and ensure good air to prevent fungal diseases.
What is the best fertilizer for Vanda Orchids?
Feed Vanda Orchids with an orchid's fertilizer every week during the active growth season (spring and summer). Ensure to follow the manufacturer's instructions.
Withhold feeding in the cold season (fall and winter) to avoid fertilizer burn as growth is reduced at this time. Do not feed an orchid that is in flower as it can shorten the flowering period.
With orchids, it is better to err on the side of underfeeding than overfeeding as it may result in loss of roots thus death of the orchid. Overfeeding can also lead to vegetative growth at the expense of flower production.
Black, dry leaf tips are an indication of salt buildup in the soil. Every 1-2 months, flush out accumulated salts from the soil by running a steady stream of water through the soil until it drips through the drainage hole.
Potting Soil
The best potting medium for Vanda Orchid should be a rich, loose, free-draining bark soil. Avoid dense soil as it prevents air circulation and can lead to root rot. An Orchid potting mix is ideal for this plant.
When to repot a Vanda Orchid?
Repot Vanda Orchid only when growth begins to suffer which is when the lower leaves begin to die. They bloom best when they are pot-bound. Basically repotting every 2 years should be adequate.
When new growth begins; shortly after blooming is over is the best time to repot. Do not repot an orchid that is in flower as it may shorten the flowering season.
How to repot a potted Vanda Orchid?
- Select a pot with proper drainage holes or slits as the roots of a Vanda Orchid need good air circulation. The pot should be only 1 size larger than the current one. Take a look at these ceramic orchid pots with a free slotted orchid pot liner on Amazon.
- Use a loose, free-draining, bark soil to prevent the soil from getting soggy to avoid rotting.
- Clear all the soil from around the stems and roots and trim off any dried and shrivelled roots.
- Remove any dead and dying leaves from the bottom as they are breeding ground for pests and diseases.
- Cut away dead roots to create space for the growth of new roots.
- Water the orchid thoroughly and ensure that both the soil and the roots absorb all the water they need.
Pruning & Grooming
Pruning Vanda Orchid is easy:
- Remove dead and diseased leaves by cutting them at the base with a sharp, sterilized pruning scissors or knife for clean cuts and to avoid cross-contamination.
- When flowering is over, cut the flower stalk 1 inch above the 3rd node from the bottom.
Occasionally clean the leaves by damp-wiping with a soft cloth to keep them clean and also discourage pests and diseases infestations.
Propagation: How do you multiply Vanda Orchids?
Vanda Orchids are propagated from stem cuttings or from keikis, at the beginning of the growing season (spring to early summer), for faster establishment.
1. How to propagate Vanda Orchids from keikis
Vanda Orchids naturally produce "baby" orchids called 'keiki' which normally appear on an old or new flower spike. Keikis are identical copies of the parent plant.
Keiki growth can be triggered by prolonged exposure to high temperature during the final phase of spike growth. Propagation feom keikis is the easiest and most effective method.
Propagating Vanda Orchid from keikis
- Using sterilized scissors, detach the keiki from the mother when it is about one year old and has developed 2-3 leaves and 1-3 inches long roots.
- Pot the keiki in fresh potting medium. Direct the roots of the keiki downwards and provide support for the keiki.
- Place the set up in a well-lit place and mist the keiki regularly to maintain a humid enviroment.
- Allow the new orchid to be well established before transplanting it after which you can begin routine care.
2. How to propagate Vanda Orchids from stem cuttings
Vanda Orchids produce aerial roots along the stem at the nodes. The stem can be cut between the nodes and used to propagate new plants. This method is best for large orchids.
Propagating Vanda Orchid from stem cuttings
- Take a stem cutting from the tip of the orchid by cutting between the stem nodes.
- Ensure the cutting has a healthy aerial root system and some leaves. Healthy Vanda Orchid aerial roots are white in color with green tips.
- Allow the cut section to dry for 1-2 days to prevent rotting.
- Apply a fungicide on the cuts to prevent fungal infestations.
- Feed the mother orchid with a balanced water-soluble fertilizer to promote the growth of new shoots.
- Pot the cutting in fresh orchid soil and place the set up in a warm, well-lit place away from direct sunlight.
- Water thoroughly until water comes through the drainage holes and allow the soil to dry out between waterings.
- Allow the new orchid to be well established before moving it to its display position.
Vanda Orchid Problems & Remedies
Vanda Orchid problems are dropping leaves, yellow leaves, brown leaves, lack of blooms, black and dying leaf tips, pests and diseases among others. Keep reading for more on these problems and how to fix them.
Why are my Vanda Orchids losing leaves?
Your Vanda Orchid is losing leaves due to too little light, inconsistent watering, temperature stress or hot sunshine.
How to fix it
Too little light: Position the plant in a brighter spot or instal a grow light if the natural light is not enough.
Inconsistent watering: Water when the roots become silvery-white. Do not allow the soil to dry out completely for a prolonged period.
Temperature stress: Keep the plant away from sources of drafts to avoid extreme temperatures.
Hot sunshine: Place the plant away from hot sunlight or use a light curtain to filter the sunrays.
Why are my Vanda Orchid turning yellow?
Some of the causes of yellow leaves on your Vanda Orchid are low light, inconsistent watering, soggy soil, too much sunlight or nutrient deficiency.
How to fix it
Low light: Move the plant to a brighter spot or instal a grow light if the natural light is not adequate.
Inconsistent watering: Do not water on a schedule; water when the roots appear whitish.
Soggy soil: Use a bulky, orchid potting soil and a pot with adequate drainage holes or slits.
Too much sunlight: Diffuse excess sunshine with a light or sheer curtain.
Nutrient deficiency: Apply a quality orchid's fertilizer in spring and summer.
Why is my Vanda leaves turning brown?
The main causes of brown leaves on your Vanda Orchid are hot sunlight, underwatering, extreme temperatures or fertilizer burn.
How to fix it
Hot sunlight: Keep the orchid away from hot midday sun or filter the sunlight with a sheer curtain.
Underwatering: Water when the roots turn silvery white.
Extreme temperatures: Keep the orchid away from sources of drafts like windy doors, stoves, heat sources, AC units among others.
Fertilizer burn: Avoid too much fertilizer and do not feed in fall and winter.
Why is my Vanda not blooming?
Your Vanda Orchid is not blooming due to too little light, overfeeding, lack of temperature variation or overpotting.
How to fix it
Too little light: Position the orchid in a brighter spot or instal grow lights if the natural lighting is not sufficient.
Overfeeding: Feed the orchid once weekly in the growing season (spring and summer) with an orchid's fertilizer.
Lack of temperature variation: Expose the orchid to cooler nights to trigger blooming; a difference of 10-150C is needed.
Overpotting: Avoid too frequent repotting, repot into a pot one size larger, only when growth begins to suffer.
Black and dying leaf tips
Black and dying leaf tips on Vanda Orchids are caused by dissolved chemicals (chlorine, flourides and others) in the water or by buildup of salts in the soil.
How to fix it
Dissolved chemicals: Water with rain water, distilled water or filtered water only.
Salts buildup: Flush out excess salts every 1-2 months, by running a stream of water through the soil until it drains through the drainage hole.
Pests
Vanda Orchids are prone to mealybugs, scale insects, slugs and snails infestation.
How to fix it
- Isolate the affected orchid to prevent spread to other plants and treat it with neem oil or insecticidal soap. Ensure to follow the manufacturer's instructions.
- Regularly inspect the orchid for these pests and carry out timely control measures.
- Keep the plant properly pruned to discourage the pests.
Diseases
Mold on Vanda leaves is an indication of powdery mildew which is enhanced by damp conditions.
How to fix it
- Seperate and treat the affected plant with neem oil as per the manufacturers recommendations.
- Do not mist the leaves and avoid wetting the leaves during watering.
- Maintain good air circulation for the orchid to discourage the disease.
Frequently Asked Questions (FAQs)
1. Can Vanda Orchids grow indoors without soil?
Yes. Vanda Orchids are epiphytic and thrive when grown bare-root, in baskets, or mounted on wood.
2. Do Vanda Orchids like full sun?
Vanda Orchids need 4-6 hours of morning or late afternoon sun but not hot midday sun which can cause scorching.
3. What should Vanda Orchid roots look like?
Healthy Vanda Orchid roots are silvery-white in color with green tips.
4. How long should I soak Vanda Orchid roots?
Soak Vanda Orchid roots until they turn color from whitish to green.
5. Should I trim Vanda Orchid roots?
No. Cut away only the dead Vanda Orchid roots to create space for the growth of new roots.
6. Why are the leaves of my Vanda Orchid splitting?
The leaves of your Vanda Orchid are splitting due to underwatering or low humidity.
7. How long does it take for a Vanda Orchid to mature?
A Vanda Orchid can take between 1-2 years to mature and begin blooming.
You liked it? Share on social media.
Related Content
Amazon Associates Disclosure
Homeplantsguide.com is a participant in the Amazon Services LLC Associates Program, an affiliate advertising program designed to provide a means for sites to earn advertising fees by advertising and linking to amazon.com.